Battery switch on travel trailer function is crucial for managing your RV’s power. This guide breaks down everything you need to know, from understanding different switch types and their wiring to troubleshooting problems and ensuring safe operation. We’ll cover installation, maintenance, and integrating your battery switch with solar panels and inverters. Get ready to become a power management pro!
We’ll explore the various types of battery switches available, highlighting their advantages and disadvantages for your specific travel trailer needs. We’ll delve into wiring diagrams, troubleshooting common issues, and essential safety precautions to keep you and your RV safe. By the end, you’ll confidently manage your travel trailer’s power system.
Understanding Battery Switch Functionality in Travel Trailers
A battery switch is a crucial component in a travel trailer’s electrical system, allowing you to manage power flow between your house batteries and the tow vehicle’s charging system, or to isolate the batteries completely. Understanding its function is key to preventing battery drain and ensuring reliable power for your appliances and systems.
Types of Battery Switches Used in Travel Trailers
Several types of battery switches are commonly used in travel trailers, each offering different levels of control and functionality. These include simple on/off switches, dual battery switches offering separate control over two battery banks, and more sophisticated switches with multiple positions for various operational modes. The choice depends on the complexity of your electrical setup and your power management needs.
For instance, a simple on/off switch is sufficient for a single battery setup, while a dual battery switch is ideal for systems with separate house and starting batteries. More advanced switches may incorporate features like a “both” position to combine battery banks or a “off” position for complete isolation.
So, you’re planning a trip? Awesome! First things first: get yourself sorted with travel insurance. Check out Aon travel insurance for some solid coverage options. Once that’s done, you can focus on the fun stuff, like setting up your audiophile travel setup. Seriously, good tunes make any adventure better.
Don’t forget your noise-cancelling headphones!
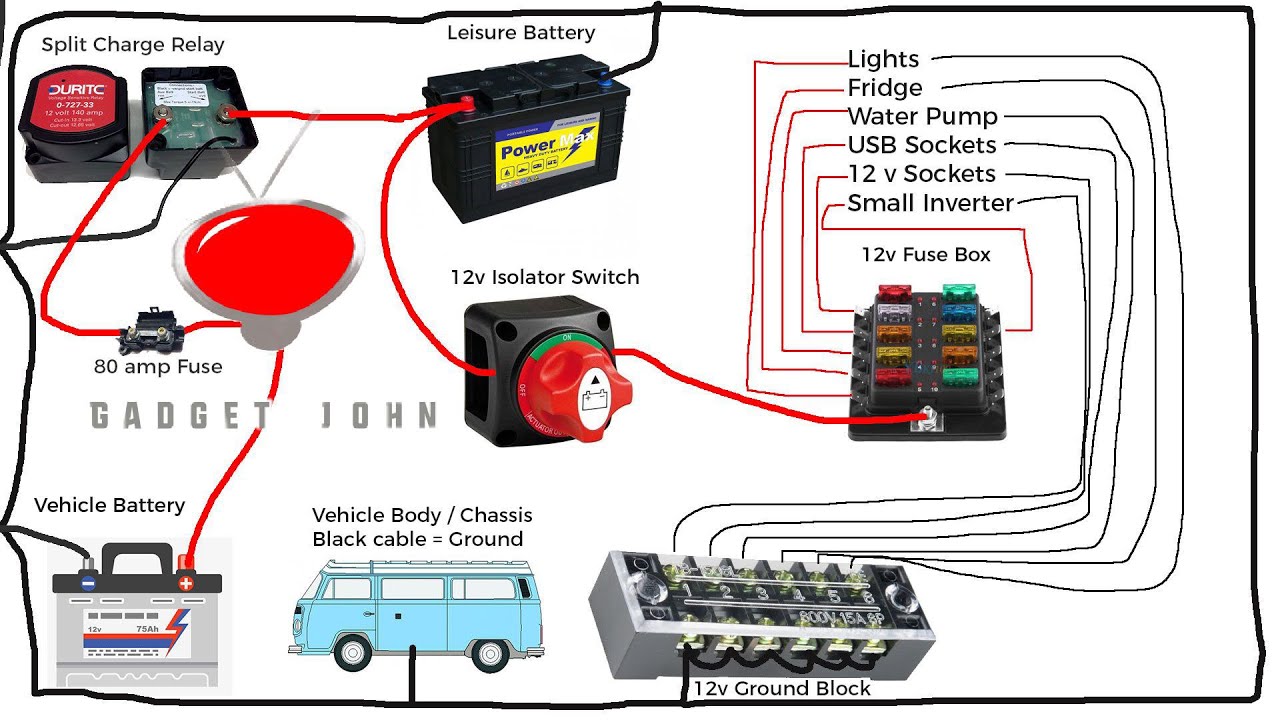
Typical Wiring Diagrams for a Battery Switch Setup
A basic wiring diagram for a single battery switch would show the positive (+) cable from the battery connecting to the switch’s input, and the switch’s output then connecting to the positive bus bar that feeds power to the trailer’s electrical system. The negative (-) cable typically connects directly to the chassis or negative bus bar without passing through the switch.
For dual battery switches, a similar setup is used for each battery, with the switch controlling each bank’s connection to the main power bus. Each battery would have its own positive cable routed to its respective switch input, and each switch output would connect to the main power bus, allowing independent control over each battery bank. A detailed diagram would also show fuses or circuit breakers in the circuit for safety and protection.
More complex setups might involve additional components like solar charge controllers or battery chargers.
Installing a Battery Switch
Proper installation of a battery switch is essential for safety and reliable operation. First, disconnect the negative (-) cable from both the battery and the trailer’s electrical system. Next, identify a suitable location for the switch, ensuring it’s easily accessible and protected from the elements. Mount the switch securely using appropriate hardware. Connect the positive (+) cable from the battery to the switch’s input terminal, making sure the connection is tight and secure.
Connect the output terminal of the switch to the positive bus bar feeding the trailer’s electrical system. Finally, reconnect the negative (-) cable. Always refer to the specific instructions provided with your chosen battery switch for detailed installation guidance and safety precautions. Remember to always double-check all connections before turning on any power.
Power Flow with and Without Battery Switch Engaged
The following flowchart illustrates the power flow with a simple on/off battery switch.[Imagine a flowchart here. The top would show the battery. A line would go down to a box labeled “Battery Switch”. One line from the switch would go to “Trailer Electrical System” and the other to “OFF”. When the switch is ON, the line to “Trailer Electrical System” is solid, the line to “OFF” is dashed.
When the switch is OFF, the line to “Trailer Electrical System” is dashed, the line to “OFF” is solid. This visually represents the flow of power with the switch on and off.]
Troubleshooting Common Battery Switch Issues: Battery Switch On Travel Trailer Function
Your travel trailer’s battery switch is a critical component, ensuring you can seamlessly switch between your trailer’s battery and your vehicle’s charging system or shore power. Problems with this switch can leave you stranded without power. Understanding common issues and how to troubleshoot them is essential for a smooth camping experience.
This section will guide you through identifying, diagnosing, and resolving common problems related to your travel trailer’s battery switch. We’ll cover troubleshooting techniques, common wiring errors, and preventative maintenance steps to keep your system running efficiently.
Battery Switch Troubleshooting Table
This table summarizes common problems, their likely causes, and solutions. Remember to always disconnect power before working on any electrical components.
Planning a trip? Don’t forget to sort out your travel insurance! Check out Aon travel insurance for comprehensive coverage. Then, if you’re an audiophile, make sure you check out audiophile travel aetup to ensure your listening experience on the go is top-notch. These two things will make your trip much smoother and more enjoyable!
| Problem | Cause | Solution | Notes |
|---|---|---|---|
| No power to appliances | Switch is in the OFF position or faulty | Verify switch position. Test the switch with a multimeter (see below). Replace if faulty. | Check all fuses and breakers. |
| Batteries not charging | Incorrect switch setting, faulty charging system, or bad battery connections | Ensure the switch is in the correct position for charging. Inspect charging system components and battery connections for corrosion or damage. | Consider having a professional check your charging system if problems persist. |
| Appliances work on one battery bank but not the other | Faulty switch, bad connection in the wiring to one battery bank, or a dead battery. | Check the wiring connections to both battery banks. Test each battery’s voltage with a multimeter. Replace a faulty switch. | Ensure both batteries are of the same type and voltage. |
| Switch feels loose or unresponsive | Loose mounting screws or internal switch failure | Tighten mounting screws. If the problem persists, replace the switch. | Use appropriate sized screws for your switch type and mounting surface. |
Testing the Battery Switch with a Multimeter
A multimeter is an invaluable tool for diagnosing battery switch problems. Here’s how to use it to test your switch:
- Disconnect power: Before beginning, disconnect the negative terminal from both batteries.
- Set the multimeter: Set your multimeter to measure DC voltage (usually indicated by a symbol showing a V with a — next to it).
- Test for continuity: Set your multimeter to the continuity test setting (usually indicated by a symbol showing a diode). Place one multimeter lead on each terminal of the switch in the ON position. A continuous beep and low resistance reading indicate good continuity.
- Test voltage: With the switch in the ON position, measure the voltage across the battery terminals. A reading close to the battery’s rated voltage confirms proper connection. Repeat this for each battery bank.
Common Wiring Errors
Incorrect wiring is a frequent cause of battery switch malfunctions. Common errors include loose connections, reversed polarity, and incorrect wiring to the charging system.
- Loose connections can cause intermittent power loss or complete failure. Always ensure all connections are tight and corrosion-free.
- Reversed polarity (connecting the positive and negative terminals incorrectly) can damage your batteries and other electrical components. Double-check your wiring diagram before connecting anything.
- Incorrect wiring to the charging system will prevent batteries from charging properly. Consult your trailer’s wiring diagram for the correct connections.
Preventative Maintenance
Regular maintenance can significantly extend the lifespan of your battery switch and prevent problems.
- Inspect connections: Regularly inspect all connections for corrosion and tightness. Clean any corrosion with a wire brush and apply dielectric grease to prevent future corrosion.
- Check switch operation: Periodically test the switch to ensure it’s functioning correctly. Listen for any unusual clicking or grinding noises.
- Keep it clean and dry: Protect the switch from moisture and debris to prevent corrosion and damage.
Integrating Battery Switches with Solar Panels and Inverters

Properly integrating your battery switch with solar panels and an inverter is crucial for efficient power management in your travel trailer. This ensures you can charge your batteries from both shore power and solar, and utilize your inverter to power AC devices without draining your batteries prematurely. Understanding the interplay between these components is key to maximizing your off-grid capabilities.
Solar Panel Integration with Battery Switch
A battery switch acts as the gatekeeper for power flowing to and from your house batteries. When charging from solar panels, the solar charge controller regulates the voltage and current going to your batteries. The battery switch, in its “on” position (usually connecting the house batteries to the main electrical system), allows the solar-charged power to be available to your trailer’s systems.
If the switch is off, the solar panels still charge the batteries, but that power isn’t accessible to your appliances until the switch is turned on. Essentially, the switch controls
access* to the already charged batteries, not the charging process itself.
Inverter Wiring with Battery Switch
Connecting your inverter to the battery switch is straightforward but requires careful attention to safety. The inverter’s positive (+) and negative (-) leads should be connected to theoutput* side of the battery switch, on the terminals that are connected to the house batteries when the switch is in the “on” position. This ensures that the inverter only draws power from the batteries when the switch is activated.
Never connect the inverter directly to the battery terminals without going through the switch. Use appropriately sized wiring and fuses to protect the inverter and your battery system. Always disconnect the negative terminal first when working on any electrical system.
Travel Trailer Electrical System Diagram
Imagine a simple block diagram. At the top, we have two solar panels, connected to a solar charge controller. From the charge controller, a wire runs down to the positive (+) terminal of your house batteries. The negative (-) terminal of the batteries is grounded to the trailer chassis. The house batteries are then connected to a battery switch. From the battery switch, one set of wires runs to the main power distribution panel of the trailer, providing power to the 12V system. Another set of wires runs from the battery switch to the input terminals of a power inverter. The inverter’s output provides 120V AC power to your appliances. Finally, a shore power connection (30 or 50 amp) also connects to the main power distribution panel.
Best Practices for Power Management, Battery switch on travel trailer function
Effective power management requires strategic use of your battery switch. When connected to shore power, you might leave the battery switch on to charge your house batteries and power your trailer simultaneously. However, when relying solely on solar power, you’ll want to ensure the switch is on to allow the solar-charged batteries to power your appliances. When disconnecting from shore power and relying on batteries, turn the switch off to isolate the house batteries and prevent accidental discharge from auxiliary loads when not in use.
Regularly monitor your battery levels to avoid deep discharges. Using a battery monitor is highly recommended for precise tracking of your battery’s state of charge.
Mastering your travel trailer’s battery switch is key to a smooth and safe RVing experience. By understanding the different types, their proper installation and maintenance, and integrating them with solar and inverters, you can optimize power usage and prevent potential issues. Remember safety first – always disconnect the battery before working on the electrical system. Happy travels!
Commonly Asked Questions
What’s the difference between a single-pole and double-pole battery switch?
A single-pole switch controls one battery, while a double-pole switch controls two, often allowing you to isolate one battery (like your house battery) from the other (like your starting battery).
How often should I check my battery switch?
Visually inspect your battery switch monthly for corrosion or loose connections. A yearly more thorough check, possibly including testing with a multimeter, is recommended.
My battery switch is making a clicking noise. What could be wrong?
A clicking noise often indicates a low battery voltage or a problem with the switch itself. Check your battery voltage and, if necessary, replace the switch.
Can I use a battery switch with a lithium-ion battery?
Yes, but you need a switch compatible with lithium-ion batteries, as they have different voltage and charging requirements than lead-acid batteries. Check the switch’s specifications carefully.
